- Special Tools Guide
- Hat Bending (Counter-Type)
Hat Bending (Counter-Type)
SPCC : 0.6 - 1.6mm SUS : 0.6 - 1.2mm
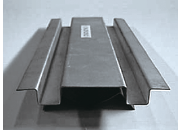
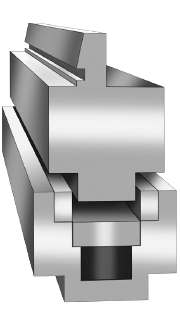
This tool creates square-shape (like Hat shape ) groove by one operation. Four (4) bends can be made all in one operation material and no turning is required. Product flatness and dimensional accuracy is well satisfied.
| Work Sample | Work Profile | Tool Image |
|---|---|---|
 |
 |
 |
Tool Spec.
| Mat. | SPCC, SUS, AL |
| Thickness mm | 0.6 - 1.6(SUS less than 1.2) |
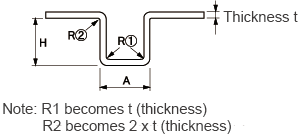
| Hight (H) mm | (t x 5) - 15 |
| Width (A) mm | (t x 4) - 30 |
Required Tonnage
Required bending tonnage /per m(SPCC) unit kN/m| Radius mm | 5 | 10 | 15 | 20 | 30 | |
|---|---|---|---|---|---|---|
| Thickness mm | 0.6 | 360 | 350 | 350 | 340 | 340 |
| 0.8 | 490 | 470 | 470 | 470 | 460 | |
| 1 | 610 | 590 | 580 | 580 | 580 | |
| 1.2 | - | 700 | 690 | 680 | 680 | |
| 1.6 | - | 950 | 930 | 930 | 920 | |
* Multiply x 1.5 to above figure for stainless steel, and x 0.6 to Al A5052.
Necessary Tonnage Calculation
| SPCC | Tonnage /m above x1.0 x product length(mm)÷1000 |
|---|---|
| SUS | Tonnage /m above x1.5 x product length(mm)÷1000 |
| AL | Tonnage /m above x0.6 x product length(mm)÷1000 |
Cautions
Marring
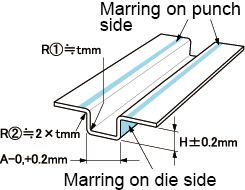
Marring appears on the punch hold-down area and die side surface.

Check Machine Capacity
Be sure that required tonnage gained by equation above does not exceed the machine capacity.
Product Accuracy
Product height accuracy becomes ± 0.2mm. Product width A accuracy -0, +0.2mm. R1 radius becomes t (material thickness) and R2 becomes t x 2.